Author Archives: purpleblob

Displaying Hierarchical data in Infragistics XamDataGrid

Before I start this post, let me just say I’m using an old version of the Infragistics XamDataGrid for this post, version 10.3. Hence this may have been changed in subsequent releases, but as I have a legacy application to support, that’s the version we’re using.

I want to display hierarchical data within the grid, so let’s start with a sample view model.

public class EmployeeViewModel
{
   public EmployeeViewModel()
   {
      Manages = new ObservableCollection<EmployeeViewModel>();
   }

   public string Name { get; set; }
   public ObservableCollection<EmployeeViewModel> Manages { get; set; }
}

Note: I’ve not bothered with supporting the INotifyPropertyChanged interface etc. this is bare bones just to demonstrate the concepts

So the EmployeeViewModel represents a basic employee hierarchy. Here’s a factory that creates the same data, which should make the hierarchy quite obvious.

public static class EmployeeViewModelFactory
{
   public static ObservableCollection<EmployeeViewModel> Create()
   {
      var employees = new ObservableCollection<EmployeeViewModel>();

      var bob = new EmployeeViewModel {Name = "Bob"};
      var bill = new EmployeeViewModel { Name = "Bill" };
      var fred = new EmployeeViewModel { Name = "Fred" };
      var alfred = new EmployeeViewModel { Name = "Alfred" };
      var jim = new EmployeeViewModel { Name = "Jim" };
      var jeff = new EmployeeViewModel { Name = "Jeff" };
      var craig = new EmployeeViewModel { Name = "Craig" };

      bob.Manages.Add(bill);
      bob.Manages.Add(fred);

      alfred.Manages.Add(jim);

      jim.Manages.Add(jeff);

      employees.Add(bob);
      employees.Add(alfred);
      employees.Add(craig);

      return employees;
   }
}

Now it’s pretty easy to configure the XamDataGrid to handle this data, I’ll manually create the fields, so here’s the XAML

<igDP:XamDataGrid GroupByAreaLocation="None" DataSource="{Binding}">

   <igDP:XamDataGrid.FieldLayoutSettings>
      <igDP:FieldLayoutSettings ExpansionIndicatorDisplayMode="CheckOnDisplay"
                                          AutoGenerateFields="False"/>
   </igDP:XamDataGrid.FieldLayoutSettings>

   <igDP:XamDataGrid.FieldLayouts>
      <igDP:FieldLayout>
         <igDP:FieldLayout.Fields>
            <igDP:Field Name="Name" />
            <igDP:Field Name="Manages" Visibility="Hidden" />
         </igDP:FieldLayout.Fields>
      </igDP:FieldLayout>
   </igDP:XamDataGrid.FieldLayouts>

</igDP:XamDataGrid>

This will produce the following UI

XamDataGrid displaying hierarchial data

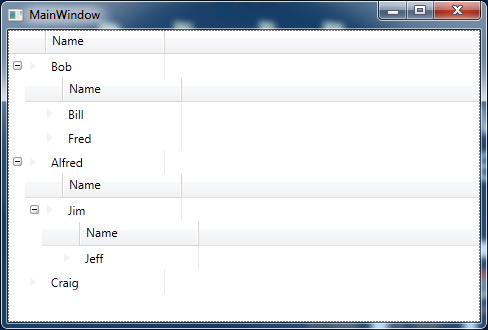
This is great, but I don’t really want the subheadings for this data and I’d prefer if the child columns lined up with the parents, more like a treeview and this is where things get a little tricky.

Removing the child item headers

To remove the headers we use

<igDP:FieldLayout.Settings>
   <igDP:FieldLayoutSettings LabelLocation="Hidden" />
</igDP:FieldLayout.Settings>

This code is placed within the FieldLayout section, but ofcourse if you do this in the one and only FieldLayout you’ll also lose the heading of the parent row.

So what you might try is to implement a second FieldLayout section as per

<igDP:XamDataGrid.FieldLayouts>
   <igDP:FieldLayout>
      <igDP:FieldLayout.Fields>
         <igDP:Field Name="Name" />
         <igDP:Field Name="Manages" Visibility="Hidden" />
      </igDP:FieldLayout.Fields>
  </igDP:FieldLayout>

  <igDP:FieldLayout>
     <igDP:FieldLayout.Settings>
        <igDP:FieldLayoutSettings LabelLocation="Hidden" />
     </igDP:FieldLayout.Settings>
     <igDP:FieldLayout.Fields>
        <igDP:Field Name="Name" />
        <igDP:Field Name="Manages" Visibility="Hidden" />
     </igDP:FieldLayout.Fields>
   </igDP:FieldLayout>
</igDP:XamDataGrid.FieldLayouts>

But this will not solve the problem and here’s the gotcha…

From my understanding the FieldLayout is based upon the the field names on your objects and hence as the EmployeeViewModel is used throughout only the first FieldLayout is ever applied to the view of the data. For example even if you changed all top level employees in the example to be of type ManagerViewModel (with this being an exact copy of EmployeeViewModel, and obviously fixing the code to handle this in the factory etc., you would still find only the first FieldLayout used. On the other hand if we had something like

public class ManagerViewModel
{
   public ManagerViewModel()
   {
      Manages = new ObservableCollection<EmployeeViewModel>();
   }

   public string Name { get; set; }
   public ObservableCollection<EmployeeViewModel> Manages { get; set; }
}

public class EmployeeViewModel
{
   public EmployeeViewModel()
   {
      DepartmentManages = new ObservableCollection<EmployeeViewModel>();
   }

   public string Name { get; set; }
   public ObservableCollection<EmployeeViewModel> DepartmentManages { get; set; }
}

public static class EmployeeViewModelFactory
{
   public static ObservableCollection<ManagerViewModel> Create()
   {
      var employees = new ObservableCollection<ManagerViewModel>();

      var bob = new ManagerViewModel { Name = "Bob" };
      var bill = new EmployeeViewModel { Name = "Bill" };
      var fred = new EmployeeViewModel { Name = "Fred" };
      var alfred = new ManagerViewModel { Name = "Alfred" };
      var jim = new EmployeeViewModel { Name = "Jim" };
      var jeff = new EmployeeViewModel { Name = "Jeff" };
      var craig = new ManagerViewModel { Name = "Craig" };

      bob.Manages.Add(bill);
      bob.Manages.Add(fred);

      alfred.Manages.Add(jim);

      jim.DepartmentManages.Add(jeff);

      employees.Add(bob);
      employees.Add(alfred);
      employees.Add(craig);

      return employees;
   }
}

and the XAML might look like

<igDP:XamDataGrid GroupByAreaLocation="None" DataSource="{Binding}">
   <igDP:XamDataGrid.FieldLayoutSettings>
      <igDP:FieldLayoutSettings ExpansionIndicatorDisplayMode="CheckOnDisplay"
                 AutoGenerateFields="False"/>
   </igDP:XamDataGrid.FieldLayoutSettings>
   <igDP:XamDataGrid.FieldLayouts>
   <igDP:FieldLayout>
      <igDP:FieldLayout.Fields>
         <igDP:Field Name="Name" />
         <igDP:Field Name="Manages" Visibility="Hidden" />
      </igDP:FieldLayout.Fields>
   </igDP:FieldLayout>

   <igDP:FieldLayout>
      <igDP:FieldLayout.Settings>
         <igDP:FieldLayoutSettings LabelLocation="Hidden" />
      </igDP:FieldLayout.Settings>
      <igDP:FieldLayout.Fields>
         <igDP:Field Name="Name" />
         <igDP:Field Name="DepartmentManages" Visibility="Hidden" />
      </igDP:FieldLayout.Fields>
   </igDP:FieldLayout>
   </igDP:XamDataGrid.FieldLayouts>
</igDP:XamDataGrid>

We would now see the following

XamDatdGrid without subheadings

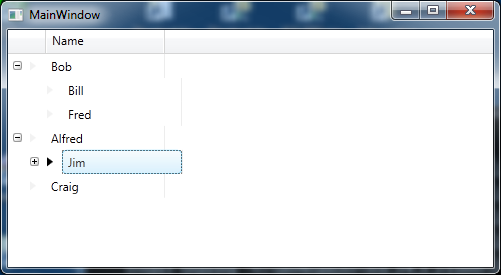
Not ideal, but we now know why EmployeeViewModel referencing itself in the Manages property fails to work. However we now have some more oddities, including the fact that the column lines are out of alignment. I’ll be writing another post on my attempts to resolve this.

References

Can I choose a field layout based on data Type?
FieldLayout Class

Comparing a generic to its default value

This is a very short post on something which, for some reason, I keep forgetting and having to find code I’ve written in the past to refresh my memory – so I thought I’d write a quick post to remind myself about this.

So you have a generic type T. Maybe it’s passed as an argument to a method and you want to check whether it’s set to its default value (in the case of classes this is equivalent to null).

To do this we use the following code (where o is the variable name of some generic type)

if(EqualityComparer<T>.Default.Equals(o, default(T))) 
{
   // do something
}

As previously stated – for class types, this is equivalent to null, for other types it depends upon their default value.

This code will handle structs and classes as well as Nullable types and also avoids boxing (see C# 5.0 in a Nutshell).

Starting out with RavenDB

I’m just starting to try out RavenDB, so thought I’d write a quick post highlighting basic CRUD operations using it.

RavenDB can be run as both a server or locally as an embedded datastore. For these examples we’ll use the server run via the command prompt. At the end of the post I will demonstrate what’s needed to get the Embeddable version up and running.

Let’s get the server and get an instance of RavenDB up and running

  • Download the current release of RavenDB from here
  • I downloaded the zip – so either unzip then go to the RavenDB\Server folder or find this folder where the installation place the RavenDB app.
  • Run Raven.Server.exe from the Server folder. If all went well you should have an instance of the RavenDB server running, to check this, from your preferred browser navigate to http://http://localhost:8080/ and you should see the RavenDB studio
  • From the studio create a new database, for simplicity I named mine Test1

Creating a client

Before we get into the actual CRUD operations, let’s get a project up with the pre-requisites for the code to follow

  • Run Visual Studio and create a new console application
  • Using NuGet install the RavenDB Client package
  • Let’s create a simple Person object to store, here’s mine
    public enum Gender
    {
       Male,
       Female
    }
    
    public class Person
    {
       public string FirstName { get; set; }
       public string LastName { get; set; }
       public DateTime DateOfBirth { get; set; }
       public Gender Gender { get; set; } 
    }
    

Let’s create some data in our new database

Now let’s access the store and save a new Person object, something like this

var documentStore = new DocumentStore 
{ 
   Url = "http://localhost:8080/", 
   DefaultDatabase = "Test1"
};
documentStore.Initialize();

using (var session = documentStore.OpenSession())
{
   Person person = new Person
   {
      FirstName = "Scooby",
      LastName = "Doo",
      DateOfBirth = new DateTime(1969, 9, 13),
      Gender = Gender.Male
   };

   session.Store(person);
   session.SaveChanges();
}

Now if we look at the RavenDB studio and the Test1 database we should see two documents, one system document and a “People” document.

Time to retrieve an object from the database

Now let’s see how we get the object. Raven stored an Id “people/1” with my data, so we’ll use that key to get that document.

var documentStore = new DocumentStore 
{ 
   Url = "http://localhost:8080/", 
   DefaultDatabase = "Test1"
};
documentStore.Initialize();

using (var session = documentStore.OpenSession())
{
   Person person = session.Load<Person>("people/1");
   // do something with the person instance
}

Updating a document

To update a document we simply load the document, make the changes then save if, for example

var documentStore = new DocumentStore 
{ 
   Url = "http://localhost:8080/", 
   DefaultDatabase = "Test1"
};
documentStore.Initialize();

using (var session = documentStore.OpenSession())
{
   Person person = session.Load<Person>("people/1");
   person.DateOfBirth = new DateTime(1996, 9, 13);
   session.SaveChanges();
}

You’ll have noticed that key’s are automatically generated, if our Person object included an Id property, such as

public class Person
{
   public string Id { get; set; }
   /// other properties
}

then Raven will automatically fill in this field when you first save an object, with the id it assigned. Alternatively you can give you own Id for an object and this will become the Id within RavenDB also, i.e. you’re assigning your own id’s at this point.

Deleting a document

So we’ve created a document, retrieved it and updated it, so now it’s time to delete a document.

using (var session = documentStore.OpenSession())
{
   Person person = session.Load<Person>("123");
   session.Delete(person);
   session.SaveChanges();
}

In the above we’re deleting using an instance of an object but it might be we’ve not loaded the object and want to simply delete using the id, in which case can can do the following

using (var session = documentStore.OpenSession())
{
   session.Advanced.DocumentStore.DatabaseCommands.Delete("123", null);
   session.SaveChanges();
}

RavenDB as an embeddable datastore

The only changes we need from the server based code (shown above) is that we no longer use the DocumentStore object but instead use the EmbeddableDocumentStore, so let’s look at this and how we get it up and running in a client.

  • RavenDB Embedded 2.5.2916 shows the package we need to install from NuGet to use the EmbeddableDocumentStore however I was getting the error “Install-Package : Updating ‘System.Spatial 5.2.0’ to ‘System.Spatial 5.0.2’ failed. Unable to find a version of ‘RavenDB.Database’ that is compatible with ‘System.Spatial 5.0.
    2’.”. Instead use Install-Package RavenDB.Embedded -DependencyVersion Highest from the Package Manager Console.

So as mentioned, to use the embeddable version of RavenDB we use the EmbeddableDocumentStore object, thus

var documentStore = new EmbeddableDocumentStore
{
   DataDirectory = "Data"
};
documentStore.Initialize();

// everything else as per the DocumentStore code from earlier

The DataDirectory is the location of your local datastore, this case the folder Data will be created off of the directory you application is run from.

Using protobuf-net in C#

protobuf-net is a .NET library around the Google Protocol Buffers.

For information on the actual Google Protocol Buffers you can checkout the Google documentation.

To get the library via NuGet you can use Install-Package protobuf-net from the Package Manager Console or locate the same from the NuGet UI.

To quote Implementing Google Protocol Buffers using C#, “Protocol Buffers are not designed to handle large messages. If you are dealing in messages larger than a megabyte each, it may be time to consider an alternate strategy. Protocol Buffers are great for handling individual messages within a large data set. Usually, large data sets are really just a collection of small pieces, where each small piece may be a structured piece of data.”

So Protocol Buffers are best used on small sets of of data, but let’s start coding and see how to use Protocol Buffers using protobuf-net.

Time to code

There are a couple of ways of making your classes compliant with the protobuf-net library, the first is to use attributes and the second without attributes, instead setting up the meta data yourself.

Let’s look at an example from the protobuf-net website, a Person class which contains an Address class and other properties.

[ProtoContract]
public class Person 
{
   [ProtoMember(1)]
   public int Id { get; set; }
   [ProtoMember(2)]
   public string Name { get; set; }
   [ProtoMember(3)]
   public Address Address { get; set;}
}

[ProtoContract]
public class Address 
{
   [ProtoMember(1)]
   public string Line1 {get;set;}
   [ProtoMember(2)]
   public string Line2 {get;set;}
}

As can be seen the classes to be serialized are marked with the ProtoContractAttribute. By default protobuf-net expects you to mark your objects with attributes but as already mentioned, you can also use classes without the attributes as we’ll see soon.

The ProtoMemberAttribute marks each property to be serialized and should contain a unique, positive integer. These identifiers are serialized as opposed to the property name itself (for example) and thus you can change the property name but not the ProtoMemberAttribute number. Obviously, as this value is serialized the smaller the number the better, i.e. a large number will take up unnecessary space.

Serialize/Deserialize

Once we’ve defined the objects we want to serialize with information to tell the serializer the id’s and data then we can actually start serializing and deserializing some data. So here goes. Assuming that we’ve created a Person object and assigned it to the variable person then we can do the following to serialize this instance of the Person object

using (var fs = File.Create("test.bin"))
{
   Serializer.Serialize(fs, person);
}

and to deserialize we can do the following

Person serlizedPerson;
using (var fs = File.OpenRead("test.bin"))
{
   Person person = Serializer.Deserialize<Person>(fs);
   // do something with person
}

Note: Protocol Buffers is a binary serialization protocol

Now without attributes

As mentioned previously, we might not be able to alter the class definition or simply prefer to not use attributes, in which case we need to setup the meta data programmatically. So let’s redefine Person and Address just to be perfectly clear

public class Person 
{
   public int Id { get; set; }
   public string Name { get; set; }
   public Address Address { get; set;}
}
    
public class Address 
{
   public string Line1 {get;set;}
   public string Line2 {get;set;}
}

Prior to serialization/deserialization we would write something like

var personMetaType = RuntimeTypeModel.Default.Add(typeof (Person), false);
personMetaType.Add(1, "Id");
personMetaType.Add(2, "Name");
personMetaType.Add(3, "Address");

var addressMetaType = RuntimeTypeModel.Default.Add(typeof(Address), false);
addressMetaType.Add(1, "Line1");
addressMetaType.Add(2, "Line2");

as you can see we supply the identifier integer and then the property name.

RuntimeTypeModel.Default is used to setup the configuration details for our types and their properties.

Inheritance

Like the SOAP serialization and the likes, when we derive a new class from a type we need to mark the base type with an attribute telling the serializer what types it might expect. So for example if we added the following derived types

[ProtoContract]
public class Male : Person
{		
}

[ProtoContract]
public class Female : Person
{	
}	

we’d need to update our Person class to look something like

[ProtoContract]
[ProtoInclude(10, typeof(Male))]
[ProtoInclude(11, typeof(Female))]
public class Person 
{
   // properties
}

Note: the identifiers 10 and 11 are again unique positive integers but must be unique to the class, so for example no other ProtoIncludeAttribute or ProtoMemberAttribute within the class should have the same identifier.

Without attributes we simply AddSubType to the personMetaType defined previous, so for example we would add the following code to our previous example of setting up the metadata

// previous metadata configuration
personMetaType.AddSubType(10, typeof (Male));
personMetaType.AddSubType(11, typeof(Female));

// and now add the new types
RuntimeTypeModel.Default.Add(typeof(Male), false);
RuntimeTypeModel.Default.Add(typeof(Female), false);

Alternative Implementations of Protocol Buffers for .NET

protobuf-csharp-port is written by Jon Skeet and appears to be closer related to the Google code using .proto files to describe the messages.

Exploring Akavache

Akavache is a key-value store/cache. It’s compatible with flavours of Windows including the desktop, WinRT and Windows Phone 8 as well as iOS, Mac and Android via Xamarin. It supports async await as well as RX observable.

Let’s code

We interact with Akavache via the BlobCache static class but before we do anything with Akavache we need to setup the application name. So at the first opportunity, such as when your applications starts you should supply Akavache with your application name.

BlobCache.ApplicationName = "MyApplicationName";

There are several different caches that we can use on the BlobCache object. Each implements the IBlobCache interface.

  • The InMemory property is used for caching anything which is to be stored (as the name suggests) in memory and thus lost when the application shuts down.
  • The LocalMachine is used to store data that is not related to the user’s account.
  • The Secure is encrypted and is used to anything you want to store in a more secure manner.
  • Finally the UserAccount is used to store data on a per user basis and can be part of a roaming profile.

As stated on the Akavache readme.md, “on the desktop, your application’s data will be stored in the %AppData%\[ApplicationName] and %LocalAppData%\[ApplicationName]”.

Inserting data into the cache

There are several insertion methods (instance and extension methods) and overloads for each. I’m not going to go through each method and their overloads, instead let’s look at the insertion method you’ll most likely start with – inserting a single object.

BlobCache.UserAccount.InsertObject("someObject", new SomeObject());

We supply a key, in this case the string someObject followed by an object. We can optionally supply a DateTimeOffset or TimeSpan to use as an expiration time, i.e. when the data is ejected from the cache.

Ofcourse, if we insert more than one item with the same key, we’re simply going to overwrite the existing item, therefore updating the cache with the last inserted value.

Getting data from the cache

Once we’ve inserted items in the cache we’ll need a way to retrieve them. As can be seen from the InsertObject method we supply a key for our cached item. So we obviously use the same key to get the value from the cache. Akavache uses an asynchronous model for getting items from a cache so uses either an IObservable (the RX way) or getting values using async await. Here’s an example using the RX method

SomeObject result = null;
BlobCache.UserAccount.GetObject<SomeObject>("someObject")
   .Subscribe(i => result = i);

and here’s the same thing using async await

SomeObject result = await BlobCache.UserAccount.GetObject<SomeObject>("someObject")

Getting data which is currently not cached

Obviously we don’t always start an application with the items already in the cache. So a common requirement is to query the cache for a value, if it doesn’t exist then get it from somewhere and then place it in the cache. Akavache offers a GetOrFetchObject method which allows the developer to to do just this. First we try to get an item from the cache and if it does not exist in the cache we can supply a Func<Task<T>> or Func<IObservable<T>> to get the item from somewhere else and it’s then automatically added to the cache for us.

SomeObject result = null;
BlobCache.UserAccount.GetOrFetchObject(
   "someObject", 
   () => Task.Factory.StartNew(() => new SomeObject()))
   .Subscribe(o => result = o);

// or using async await

SomeObject result = await BlobCache.UserAccount
   .GetOrFetchObject("someObject", 
   () => Task.Factory.StartNew(() => new SomeObject()));

We can also pass an expiration DateTimeOffset to the above method.

Note: GetOrFetchObject and GetOrCreateObject appear to do the same thing, both calling GetOrFetchObject which takes a Func<IObservable>. The former simply converts a Task<T> to an and IObservable<T> and the latter converts a Func<T> to an IObservable<T> also.

An interesting other “get” method to look at is GetAndFetchLatest. This will attempt to get a value from the cache and at the same time will use the supplied Func to get the value from some alternate place. So for example, let’s say you’re going to get a value from a webservice. This will return the current cached version (if one exists) and at the same time try to get the current value from the webservice. Hence two items may be returned.

In use…

BlobCache.UserAccount.GetAndFetchLatest(
   "someObject", () => Task.Factory.StartNew(() => new SomeObject()))
   .Subscribe(i => result = i);

In the above code the result = i will be called twice (assuming we’ve already inserted an object with the key “someObject” into the cache). As you’d expect from the previous description of this method, the first call would contain cached “someObject” value and the second would be the new object we’ve created in the task.

Removing items from the cache

Apart from setting an expiration for items as they’re added to the cache we can also use the method Invalidate to remove specific key values from the cache or InvalidateAll to remove/clear all items from the cache.

For example

BlobCache.UserAccount.Invalidate("someObject");

Query expressions in F#

Not quite the same as LINQ in syntax terms, F# includes query expressions which are in essence it’s own style of LINQ.

If we assume we have a simple example of some code in C# which uses LINQ to get strings from an array where their length is 3. In C# this might look like the following

string[] sample = {"One", "Two", "Three", "Four", "Five"};

IEnumerable<string> result = 
   from s in sample 
   where s.Length == 3 
   select s;

Note: I’ve purposefully put each part of the LINQ query on a new line for easier comparison with the equivalent F# query expression.

So here’s the same in F#

let sample = [| "One" ; "Two" ; "Three" ; "Four" ; "Five" |]

let result = query {
   for s in sample do
   where (s.Length = 3)
   select s
}

The main differences are the use of the query expression syntax query { … } and the use of the for s in sample do instead of from s in sample

References

See Query Expressions (F#) for a few examples of different query expressions and how they relate to SQL queries (and more).

Type extensions in F#

We can extend F# types by adding the equivalent of C# extension methods or something similar to partial classes in C#.

Let’s not waste time but instead get straight into the code

The type extension syntax is taken from Type Extensions (F#) which is well worth a read

type typename with
   member self-identifier.member-name =
      body
   ...
   [ end ]

[ end ] is optional in lightweight syntax.

Here’s an example of a type method for the System.String type, we’re going to add a simple Reverse function

type System.String with
    member __.Reverse = String(__.ToCharArray() |> Array.rev)

also we can create new functions like adding to a partial class

type System.String with
    member __.Append s = __.Substring(0) + s

A slightly pointless method, but at the time of writing I couldn’t think of anything more interesting.

Creating an F# WinForms application

I wanted to mess around with the FSharp.Charting library and needed to create an F# WinForms application to use it.

It’s pretty simple but there’s no template by default in Visual Studio (well not in 2013).

So here the steps to create a WinForms F# application

  • Create a new Project and select F# Application
  • This will be a console application, so next select the project properties and change the Application | Output type from Console Application to Windows Application
  • Add a reference to System.Windows.Forms
  • Change your main function to look like the following
    open System
    open System.Windows.Forms
    
    [<EntryPoint>]
    [<STAThread>]
    let main argv = 
    
        Application.EnableVisualStyles()
        Application.SetCompatibleTextRenderingDefault false
    
        use form = new Form()
    
        Application.Run(form);
    
        0 
    

Obviously this example shows us creating an empty Form. By default F# (at least in Visual Studio 2013) doesn’t include WinForm design surfaces or the likes. So it’s probably best to design your forms in a C# library and reference from your F# applications. Or, alternatively, you can hand code your WinForms.

A quick example of using FSharp.Charting

This is not mean’t to be anything other than a quick example, but as I wanted to get a F# WinForms application specifically to try out some FSharp.Charting, here’s the steps…

  • Using NuGet add a reference to FSharp.Charting to your project (developed above)
  • Add open FSharp.Charting to your Program.fs file
  • I’m going to simple use some code from the FSharp.Charting github samples, so first we need to add a reference to System.Drawing
  • Add a reference to System.Windows.Forms.DataVisualization
  • Finally change the Application.Run method to look like the following
    Application.Run (Chart.Line([ for x in 0 .. 10 -> x, x*x ]).ShowChart())
    

Now your code should look like the following

open System
open System.Windows.Forms
open FSharp.Charting

[<EntryPoint>]
[<STAThread>]
let main argv = 

    Application.EnableVisualStyles()
    Application.SetCompatibleTextRenderingDefault false

    Application.Run (Chart.Line([ for x in 0 .. 10 -> x, x*x ]).ShowChart())

    0

and this should (when run) display a line chart.

Operator overloading in F#

More adventures with F#…

Operator overloading is documented perfectly well in Operator Overloading (F#) but to summarize I’ve created this post…

Operators in F# can be overloaded at the class, record type or global level.

Overloading an operator on a class or record type

Let’s look at the syntax for overloading an operator on a class or record type.

Note: Reproduced from the Operator Overloading (F#) page

static member (operator-symbols) (parameter-list> =
    method-body

Overloading an operator which is globally accessible

Let’s look at the syntax for overloading an operator at a global level.

Note: Reproduced from the Operator Overloading (F#) post

let [inline] (operator-symbols) parameter-list = 
    function-body

More…

You can overload the “standard” operators but you can also create your own operators. For example FAKE creates it’s own global operator to combine two file paths using the @@ operator

The below is taken from the FAKE source code available in github

let inline (@@) path1 path2 = combinePaths path1 path2

As it’s pretty obvious, this is a global level overload of a newly created operator, the @@ which takes two parameters.

Where an operator may be used for binary or unary (infix or prefix), such as + or – (+., -., &, &&, %, and %% may also be used for infix or prefix operators) we need to prefix the operator with a tilde ~, hence to overload the + and use as a unary operator we’d write something like

let inline (~+) x = [ x ]

// in use we'd have

let v = + "hello"

Whereas using the + as a binary operator we’d write something like

let inline (+) x y = [ x, y ]

// in use we'd have

let v = "hello" + "world"

If you’re coming from C# to F# you’ll have already noticed the “funky” set of operators that F# supports. As already shown with the @@ operator sample (taken from FAKE) you can combine operators to produce all sorts of new operators, for example

let (<==>) x  y = [ x, y]

Describing my tables, views, stored procs etc.

Having become a little too reliant (at times) on great GUI tools for interacting with my databases, I had to remind myself it’s pretty easy to use code to do this, sure good old Aqua Studio does it with CTRL+D on a data object in the editor, or both Oracle SQL Developer and the MS SQL Server Management Studio allow us to easily drill down the item in the data object tree, but still. Here it is in code…

Tables and views

For Oracle

desc TableName

For SQL Server

exec sp_columns TableName

Stored Procs

For Oracle

desc StoredProceName

For SQL Server

exec sp_help StoredProceName

In fact sp_help can be used for Stored Procs and Tables/Views.