Category Archives: Programming

Random Port Assignment in Azure

One thing to remember when developing a service on Azure is that the port defined in ServiceDefinition.csdef by the following

<InputEndpoint name="MyService" protocol="tcp" port="200" />

is not the same as the port your service should map to.

In other words when creating a socket within your service, Azure assigns a “random” port to your service, so it may have assigned your service the port 1234. So had you created your socket listening to port 200 (as defined in the config file) you will find your service doesn’t receive any traffic.

This is because the port defined in the configuration file is really aimed at the load balancer. It will open the defined port for traffic then route it to the “random” port assigned by Azure to your service. So to create a socket to listen for traffic we need to use the Service Runtime API in Azure to find the port assigned to the service.

RoleEnvironment re = RoleEnvironment.CurrentRoleInstance.InstanceEndPoints["MyService"];
IPEndPoint ep = re.IPEndpoint;

Socket socket = new Socket(ep.AddressFamily, SocketType.Stream, ProtocolType.Tcp);
socket.Bind(ep);
socket.Listen(1000);

Storing binary data using Entity Framework

This is a real quick post, not my usual verbose ramblings :)

If you want to store binary data within a database column using Code First, then store the data as a byte array (see below).

public class SomeData
{
   // properties etc.

   // binary data, will be converted to a varbinary(max) in SQL Server
   public byte[] Data { get; set; }
}

Custom storing our ApplicationSettingsBase derived object

In my post I details how you can create an application settings class to read application settings and read/write user settings in a simple and consistent manner. But there’s more…

By default the user scoped properties are stored in a user.config file in the user’s profile. But we can actually customise where/how the settings are persisted by implementing code in a class derived from the SettingsProvider class. Firstly we need to apply the following

[SettingsProvider(typeof(MySettingsProvider))]

to the ApplicationSettingsBase derived class (in my previous post this would look like)

[SettingsProvider(typeof(ConfigurationSettingsProvider))]
public sealed class ConfigurationSettings : ApplicationSettingsBase
{
   // properties
}

Next we obviously need to implement the ConfigurationSettingsProvider. In fact Microsoft implemented this to create the LocalFileSettingsProvider class which by default is applied to our settings class (allowing us to read from the app.config and persist to the user.config).

By overriding methods such as Initialize, GetPropertyValues and SetPropertyValues we can get our settings from our own mechanism, for example a web service and persist changes back to the web service.

For further information checkout .

User application settings using ApplicationSettingsBase

There are many ways to store application settings, whether they’re roll your own XML or old INI profile file settings. Another option is to use a class derived from ApplicationSettingsBase.

ApplicationSettingsBase

To create your own configuration class, you derive it from the ApplicationSettingsBase class and then add properties to define the values you want to persist. On top of this we can override methods such as Save to allow us to customise the saving of values etc. A simple example is listed below (note: we’d often write this class as a singleton but I’ve removed extraneous code from the sample).

public sealed ProxySettings : ApplicationSettingsBase
{
   [UserScopedSetting]
   public string Host
   {
      get { return (string)this["Host"]; }
      set { this["Host"] = value; }
   }

   [UserScopedSetting, DefaultSettingValue("8080")]
   public int Port
   {
      get { return (int)this["Port"]; }
      set { this["Port"] = value; }
   }

   [ApplicationScopedSetting]
   public string ApplicationContext
   {
      get { return (string)this["ApplicationContext"]; }
   }
}

For a property to be stored or read using this mechanism, it must have the UserScopedSetting or the ApplicationScopedSettings attribute applied to it, otherwise it’s ignored from the perspective of persistence but obviously you can still use it as a non-persisted property.

ApplicationScopedSettings is used for application specific settings whereas UserScopedSetting is used for user specific settings (I know the names give this away but I thought I should make it clear). In the case of UserScopedSettings these, by default, are stored in the Documents and Settings\\Application Data in a user.config file whereas ApplicationScoreSettings are stored within the app.config for the application.

Note: The user scoped settings are not stored automatically, you need to call the ApplicationSettingsBase.Save method.

ApplicationScopedSettings are in essence read-only. Whilst we can have a getter and setter on the class (above), allowing us to change the application setting at run-time the altered values are not persisted to a storage mechanism.

Q. So what’s the point of ApplicationScopedSetting ?

A. You can add these values to your app.config and use it from your project in a similar way to using ConfigurationManager.AppSettings but obviously it can reside along with your user settings in a class as above and thus both the user and application scoped values are read in the same way, using this class. Underneath they’re separated into the user.config and app.config.

You can declare a default value to an ApplicationScopedSetting and then if you wanted to change the value in the app.config you’ll have a fallback default if the configuration is missing. The app.config will look something like

<configuration>
  <configSections>
    <sectionGroup name="applicationSettings" type="System.Configuration.ApplicationSettingsGroup, System, Version=4.0.0.0, Culture=neutral, PublicKeyToken=b77a5c561934e089" >
      <section name="MyApplication.ConfigurationSettings" type="System.Configuration.ClientSettingsSection, System, Version=4.0.0.0, Culture=neutral, PublicKeyToken=b77a5c561934e089" requirePermission="false" />
    </sectionGroup>
  </configSections>
  <applicationSettings>
    <MyApplication.ConfigurationSettings>
      <setting name="ProxyAdddress" serializeAs="String">
        <value>BlahBlah</value>
      </setting>
    </MyApplication.ConfigurationSettings>
  </applicationSettings>
</configuration>

Creating your application settings via a designer

Creating your ApplicationSettingsBase derived class is extremely useful if you have some more complex code (other than just read/write). But you can also create your own settings within Visual Studio and have it automatically created the source code for you. Simply go to the Properties folder in your solution and use the Settings.settings file, double clicking on this allows you to edit your properties and the Designer.cs will automatically be generated as a singleton and creates all the stuff as we’ve done previously ourselves. Better still this will generated the app.config code as well and save us having to remember the correct configuration xml.

You can ofcourse add more .settings files using the Add | New Item and select the Settings File.

Note: If you’re trying to track down where your configuration files might have been saved you can always call

Configuration configuration = ConfigurationManager.OpenExeConfiguration(ConfigurationUserLevel.None);
Console.WriteLine(configuration.FilePath);
configuration = ConfigurationManager.OpenExeConfiguration(ConfigurationUserLevel.PerUserRoaming);
Console.WriteLine(configuration.FilePath);
configuration = ConfigurationManager.OpenExeConfiguration(ConfigurationUserLevel.PerUserRoamingAndLocal);
Console.WriteLine(configuration.FilePath);

Partial classes and methods in C#

Partial classes, structs and interfaces

Partial classes, structs or even interfaces can be declared in C#. This mechanism allows us to split a class, struct or interface definition across multiple files which gives us some interesting possibilities.

For example, let’s same you reference a web service and you’ve generated a class like the following (I’ve removed extraneous base classes etc.)

public partial class Person
{
   private string string FirstNameField;
   private string string LastNameField;

   public string FirstName
   {
      get { return this.FirstNameField; }
      set
      {
         if((this.FirstNameField.Equals(value) != true))
         {
            this.FirstNameField = value;
            this.RaisePropertyChanged("FirstName");
         }
      }
   }

   public string LastName
   {
      get { return this.LastNameField; }
      set
      {
         if((this.LastNameField.Equals(value) != true))
         {
            this.LastNameField = value;
            this.RaisePropertyChanged("LastName");
         }
      }
   }
}

By default svcutil.exe will create the class as a partial. This allows us to now define an addition to the class that implements more functionality which can be run locally and will remain when/if we need to regenerate the proxies class above. We simply create another file (by convention this would be the .partial.cs, so in this case Person.partial.cs but of course this isn’t a requirement for partials to work).

public partial class Person
{
    public string FullName
    {
       get { return String.Format("{0} {1}", FirstName, LastName); }
    }
}

Partial Methods

Partial methods are methods whose signature can exist in one partial type but it implementation may defined in another. For example

public partial class Project
{
   partial void Run();
}

// in another file we might have
public partial class Project
{
   partial void Run()
   {
      Console.WriteLine("Running");
   }
}

A partial method must have the following:

  • The signature for the method must match in the partial type
  • The method can only return void
  • Partial methods are implicitly private and no access modifiers are allowed (even private is not allowed)

One of the key things about a partial method is the even if there’s no implementation of the method the code will still compile successfully and run. So you can use a partial method as a place holder for possible implementation at some later time if you wished and the code would still work. If no implementation exists for Run (in the above example) any calls to the Run method will be removed.

WCF Rest

Creating a REST style interface with WCF is fairly simple. The steps are listed briefly below, and in more depth below the list of steps.

1. Create your interface/service contract
2. Annotate the methods with WebGet or WebInvoke attributes
3. Create the implementation of the interface
4. Declare the endpoint within the configuration file (or in code). The binding should be webHttpBinding and should have an endpoint behaviour specificied with WebHttp
5. If need be declare the http baseAddress

In more depth

1. Create your interface/service contract
and
2. Annotate the methods with WebGet or WebInvoke attributes

[ServiceContract]
public interface IRestService
{
   [OperationContract]
   [WebGet(UriTemplate = "projects")]
   IList GetProjects();

   [OperationContract]
   [WebGet(UriTemplate = "execute/{projectName}")]
   void Execute(string projectName);
}

Note: Note to self. Don’t forget to put the ServiceContract attribute on the interface !

I’ve implemented both methods a GET methods. Assuming a baseAddress of http://localhost:8733/MyService/ to call these methods through a web browser we can simply type http://localhost:8733/MyService/projects and http://localhost:8733/MyService/execute/MyProject respectively.

3. Create the implementation of the interface

No need to list source code for this, simple implement the interface you created.

4. Declare the endpoint within the configuration file (or in code). The binding should be webHttpBinding and should have an endpoint behaviour specificied with WebHttp
and
5. If need be declare the http baseAddress

The key bit to getting everything to work is the configuration file. I’m self hosting for this example so implementing the code in the App.config

<system.serviceModel>
    <behaviors>
      <serviceBehaviors>
        <behavior name="">
          <serviceMetadata httpGetEnabled="false" />
          <serviceDebug includeExceptionDetailInFaults="false" />
        </behavior>
      </serviceBehaviors>
      <endpointBehaviors>
        <behavior name="rest">
          <webHttp/>
        </behavior>
      </endpointBehaviors>
    </behaviors>
    <services>
      <service name="StandardPlugins.MonitorService">
        <endpoint address="" binding="webHttpBinding" bindingConfiguration=""
            contract="StandardPlugins.IRestService" behaviorConfiguration="rest">
        </endpoint>
        <host>
          <baseAddresses>
            <add baseAddress="http://localhost:8733/MyService/" />
          </baseAddresses>
        </host>
      </service>
    </services>
</system.serviceModel>

Note: The REST methods should be accessible via HTTP, hence the binding is webHttpBinding and the baseAddress is http. A behaviorConfiguration is required with the webHttp element.

Further reading

http://msdn.microsoft.com/en-us/magazine/dd315413.aspx#id0070050
http://msdn.microsoft.com/en-us/library/vstudio/bb412172(v=vs.90).aspx

WCF Duplex

In many cases a client calls a service and waits for the service call to complete forming a “one way” communication channel from the client to the service. But what if you wanted a two way communication channel, for example the client calls a service method and the service then calls methods on all connected clients. This two way pattern is known as duplex.

Create the service

Let’s create a very simple duplex service which will send messages to the connected clients when changes occur on the service.

1. Create a new console project
2. Add a new item, select WCF Service and name it whatever you want (mine’s called MyService)
3. In the Program.cs Main method type the following

ServiceHost serviceHost = new ServiceHost(typeof(MyService));
serviceHost.Open();
Console.WriteLine("Service started, press any key to quit");
Console.ReadKey();
serviceHost.Close();

4. Add a new interface named IMyCallback

public interface IMyCallback
{
   [OperationContract(IsOneWay = true)]
   void Tick(DateTime dateTime);
}

5. On the IMyService contract alter the ServiceContract to read

[ServiceContract(CallbackContract = typeof(IMyCallback))]

6. Rename the default method DoWork() to Register(), in both the interface and implementation.
7. Change the Register implementation to the following

private readonly List<IMyCallback> callbacks = new List<IMyCallback>();

public void Register()
{
   callbacks.Add(OperationContext.Current.GetCallbackChannel<IMyCallback>());
}

8. For this demo we’re going to simply call the connected client(s) periodically so add the following to MyService

private readonly Timer timer;

public MyService()
{
   timer = new Timer(TimerCallback);
   timer.Change(TimeSpan.FromSeconds(10), TimeSpan.FromSeconds(10));
}

private void TimerCallback(object o)
{
   foreach (IMyCallback callback in callbacks)
   {
      callback.Tick(DateTime.Now);
   }
}

9. Finally edit the app.config. We’re going to use the TCP binding so set the httpGetEnabled to false, change the service binding to netTcpBinding and the mex binding to mexTcpBinding and alter the baseAddress to use the net.tcp protocol (see below)

<system.serviceModel>
   <behaviors>
      <serviceBehaviors>
         <behavior name="">
            <serviceMetadata httpGetEnabled="false" />
            <serviceDebug includeExceptionDetailInFaults="false" />
         </behavior>
      </serviceBehaviors>
   </behaviors>
   <services>
      <service name="DuplexService.MyService">
         <endpoint address="" binding="netTcpBinding" bindingConfiguration=""
                    contract="DuplexService.IMyService">
            <identity>
               <dns value="localhost" />
            </identity>
         </endpoint>
         <endpoint address="mex" binding="mexTcpBinding" bindingConfiguration=""
                    contract="IMetadataExchange" />
            <host>
               <baseAddresses>
                  <add baseAddress="net.tcp://localhost:8732/MyService/" />
               </baseAddresses>
            </host>
        </service>
    </services>
</system.serviceModel>

Create the client

1. Create a new console application
2. Right mouse click on References and choose Add Service Reference
3. Enter t baseAddress from the server (i.e. net.tcp://localhost:8732/MyService) then press Go
4. Set the namespace to MyService and press OK
5. We now need to implement the callback interface

public class ClientCallback : IMyServiceCallback
{
   public void Tick(DateTime dateTime)
   {
      Console.WriteLine(dateTime);
   }
}

6. And finally add the code to connect to the service

InstanceContext callback = new InstanceContext(new ClientCallback());
MyServiceClient client = new MyServiceClient(callback);
client.Open();
client.Register();
Console.WriteLine("Press a key to exit");
Console.ReadKey();
client.Close();

Now if you run the server and then one or more clients, after 10 seconds you should see the clients updated every ten seconds. This is fine except that each time a client connected to the service a new service was created for each new client. If we wanted a single instance of the server to be connected to multiple clients we can simply change a few lines in the service code.

1. On the MyService implementation add the following attribute

[ServiceBehavior(InstanceContextMode = InstanceContextMode.Single)]

2. In the Program.cs Main method make the following two changes

MyService service = new MyService();
ServiceHost serviceHost = new ServiceHost(service);

With the above we create a single instance of the MyService then assign it the the ServiceHost.
Quickstart WCF service and client

I’ve already got a post on WCF basics, but I had to quickly knock together a WCF service and client to try something out today and I thought it’d be useful to list the steps to create a real bare bones service and client in a single post.

Let’s begin with the service itself. I want to create a self hosted service running from a console app. so I can easily debug and control everything, so

1. Open a new instance of Visual Studio
2. Create a new console application.
3. Copy the following into the Main method

ServiceHost serviceHost = new ServiceHost(typeof(MyService));
serviceHost.Open();
Console.WriteLine("Service Running");
Console.ReadLine();
serviceHost.Close();

4. Add the reference to System.ServiceModel as well as a valid app.config. For example

<system.serviceModel>
   <behaviors>
      <serviceBehaviors>
         <behavior name="">
            <serviceMetadata httpGetEnabled="false" />
            <serviceDebug includeExceptionDetailInFaults="false" />
         </behavior>
      </serviceBehaviors>
   </behaviors>
   <services>
      <service name="WcfTest.MyService">
         <endpoint address="" binding="netTcpBinding" bindingConfiguration=""
                   contract="WcfTest.IMyService">
            <identity>
               <dns value="localhost" />
             </identity>
         </endpoint>
         <endpoint address="mex" binding="mexTcpBinding" bindingConfiguration=""
                    contract="IMetadataExchange" />
         <host>
            <baseAddresses>
               <add baseAddress="net.tcp://localhost:8732/MyService/" />
            </baseAddresses>
         </host>
      </service>
   </services>
</system.serviceModel>  

5. Create an interface with at least one method, as we’re calling the service MyService, let’s call the interface IMyService. You’ll need at least one method and the interface shold have a ServiceContract attribute and the method have an OperationContract, for example

[ServiceContract]
public interface IMyService
{
   [OperationContract]
   void SayHello(string name);
}

6. Implement the interface for example

public class MyService : IMyService
{
   public void SayHello(string name)
   {
      Console.WriteLine("Hello " + name);
   }
}

6. Run the application

Now to the client…

1. Open a new instance of Visual Studio
2. Create a console application
3. Add a service reference (use the url from the server, i.e. net.tcp://localhost:8732/MyService/mex from the service’s app.config)
4. Click Go
5. Click OK
6. Finally add the following code into the Main method

var client = new MyServiceClient();
client.SayHello("Scooby Doo");
client.Close();

Now we have a working service and client.

Starting out with SpecFlow

SpecFlow is a BDD (Behaviour Driven Development) tool that supplies templates and integration for Visual Studio.

If you are new to BDD (or TDD or unit testing in general) go off to your favourite search engine and search. I’m sure there are far better definitions out there than I’ll probably come up with or try here. For those of you not wishing to waste a moment let’s start looking at SpecFlow.

The idea behind a feature is to define a test scenario in a more human readable way, in fact the perfect situation would be for the domain expert to write the scenarios to act as acceptance tests. SpecFlow is based upon Cucumber and uses the DSL Gherkin to allow the domain experts to write the scenarios.

Enough waffle let’s write a feature. We’ve got a Trade object which has a TradeDate and a StartDate. The StartDate should be calculated to be the TradeDate + 3 days.

Feature: Check the trade date is defaulted correctly
Scenario: Default the trade date
	Given Today's date is 23/10/2012
	When I create a trade
	Then the resultant start date should be 26/10/2012

The Feature text is just a name for the feature and can be followed by free form text to add documentation, in the above case I’ve not bothered. Instead I’ve gone straight to creating a Scenario.

A Scenario is basically the definition of what we want to test. Using the keywords Given, When, Then, And and But (note: I’ve not checked this is the full list). We can create the scenario for the test (don’t get too excited we still need to write the test) and then the Visual Studio integration will by default run the SpecFlowSingleFileGenerator custom tool against this feature file and create a feature.cs which contains the code for calling into your tests.

So we now have a feature file, potentially supplied by our domain expert. From this we get a .cs file generated which calls our code in the correct order and potentially passing arguments from the scenario to our test code. In the above case we want the dates to be passed to our tests. So now to write the code which will be run from the scenario generated code and here we add NUnit (or your preferred unit testing lib.) to check things are as expected.

[Binding]
public class Default_the_trade_date
{
   private Trade trade;
   private DateTime todaysDate;

   [Given("Today's date is (.*)")]
   public void Given_Todays_Date_Is(DateTime today)
   {
      todaysDate = today;
   }

   [When("I create a trade")]
   public void When_I_Create_A_CreateTrade()
   {
      trade = new Trade {TradeDate = todaysDate};
   }

   [Then("the resultant start date should be (.*)")]
   public void Then_Start_Date_Should_Be(DateTime dateTime)
   {
      Assert.AreEqual(trade.StartDate, dateTime);
   }
}

Note: I’ve named this class Default_the_trade_date this is the name I gave the scenario, this is not a requirement but makes it obvious what this code is for.

In the above you’ll notice the use of attributes which match the text in the scenario for each step, i.e. Given, When, Then. The text uses regular expressions, so matches the text to the scenario text but in this case the (.*) converts the dates into arguments to be passed into the test methods.

You can now right mouse click on your project or better still your .feature and select Run SpecFlow Scenarios. Unfortunately the above code will fail. As I’m using British date formats, i.e. dd/MM/yyyy and the default DateTime parser is en-US. So we need to edit the App.config for our scenarios to have

<language feature="en-GB" tool="{not-specified}" />

within the specFlow element.

If all went to plan, when you run the specflow scenarios the tests show green.

Note: If we have multiple features and/or scenarios which maybe use the same text, for example in the above code maybe we have several features and scenarios which use the Given “Today’s date is “. We can set the Scope attribute on the test classes and either mark the scenario with a tag

@tradeDate
Scenario: Default the trade date
   ...

or we can use the Feature and/or Scenario name such as

[Binding]
[Scope(Feature = "Check the trade date is defaulted correctly")]
public class Default_the_trade_date
{
   // code
}

See Scoped bindings for more on this and note the preference is towards not using such couplings.

Service Reference Failure – Cannot import wsdl:portType

Got an interesting exception whilst adding a service reference to a project, as seen below


Custom tool warning: Cannot import wsdl:portType
Detail: An exception was thrown while running a WSDL import extension: System.ServiceModel.Description.DataContractSerializerMessageContractImporter
Error: Could not load file or assembly ‘NLog, Version=2.0.0.0, Culture=neutral, PublicKeyToken=5120e14c03d0593c’ or one of its dependencies. The system cannot find the file specified.

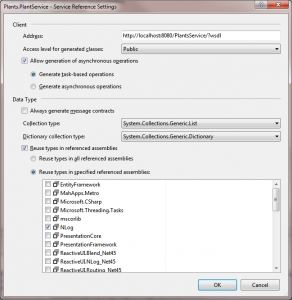
Luckily there’s an easy fix – right mouse click on the reference under the Service References section of the solution and select Configure Service References

ConfigureServiceReference

And as shown, select Reuse types in specified referenced assemblies and check the NLog assembly.

I need to update this post with the whys and wherefores of this change, but it works.