Before I start this post, let me just say I’m using an old version of the Infragistics XamDataGrid for this post, version 10.3. Hence this may have been changed in subsequent releases, but as I have a legacy application to support, that’s the version they’re using.
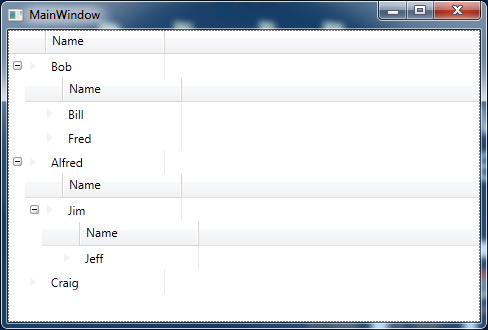
If you followed my previous post on using hierarchical data in a XamDataGrid, you’ll have noticed that the final image was hardly impressive, in that columns were not all in sync and if you resize a column, not all columns resize.
For now, let’s remove the second FieldLayout’s hidden field, so our XAML looks like the following (I’ve commented out the offending line)
<igDP:XamDataGrid GroupByAreaLocation="None" DataSource="{Binding}" Name="Grid">
   <igDP:XamDataGrid.FieldLayoutSettings>
      <igDP:FieldLayoutSettings ExpansionIndicatorDisplayMode="CheckOnDisplay"
                                          AutoGenerateFields="False"/>
   </igDP:XamDataGrid.FieldLayoutSettings>
   <igDP:XamDataGrid.FieldLayouts>
      <igDP:FieldLayout>
         <igDP:FieldLayout.Fields>
            <igDP:Field Name="Name" />
            <igDP:Field Name="Manages" Visibility="Hidden" />
         </igDP:FieldLayout.Fields>
      </igDP:FieldLayout>

      <igDP:FieldLayout>
         <igDP:FieldLayout.Settings>
            <igDP:FieldLayoutSettings LabelLocation="Hidden" />
         </igDP:FieldLayout.Settings>
         <igDP:FieldLayout.Fields>
            <igDP:Field Name="Name" />
            <!-- remove this line for now
            <igDP:Field Name="DepartmentManages" Visibility="Hidden" />
            -->
         </igDP:FieldLayout.Fields>
      </igDP:FieldLayout>

   </igDP:XamDataGrid.FieldLayouts>
</igDP:XamDataGrid>
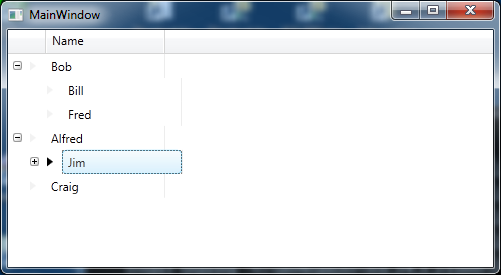
This will produce the following
However, this is an illusion that. All is still not quite as we want – if we resize the parent then you’ll see that child columns do not remain in sync with the parent. To handle this, let’s go back to the XAML and add the following to the XamDataGrid
Note: I gave the XamDataGrid the name “Grid” as we’re going to need to write some code for the following changes in functionality.
<igDP:XamDataGrid.Resources>
   <Style TargetType="{x:Type igDP:LabelPresenter}">
      <EventSetter Event="SizeChanged" Handler="EventSetter_OnHandler"/>
   </Style>
</igDP:XamDataGrid.Resources>
The EventSetter_OnHandler code looks like this
private void EventSetter_OnHandler(object sender, SizeChangedEventArgs e)
{
   var lp = sender as LabelPresenter;
   if (lp != null)
   {
      if (Grid.FieldLayouts[0].Fields.Contains(lp.Field))
      {
         var f = Grid.FieldLayouts[1].Fields[lp.Field.Index];
         f.Width = new FieldLength(lp.Field.CellWidthResolved);
      }

      if (Grid.FieldLayouts[1].Fields.Contains(lp.Field))
      {
         var f = Grid.FieldLayouts[0].Fields[lp.Field.Index];
         f.Width = new FieldLength(lp.Field.CellWidthResolved);
      }
   }
}
Now when you resize the columns all will remain in sync, however as you can see from the code this is all a little nasty in that it’s very much dependent upon the number of FieldLayouts you have etc.
Let’s not worry too much about that at the moment. As there’s something a little more pressing, if you happend to expose multiple columns, for example, suppose I added an age column to the parent and child view models and added the fields to the XAML. When moving a column around you’ll notice the child will not reorganise it’s columns, so you’d end up with, for example – the parent columns Age followed by Name whereas the child would be Name followed by Age.
To fix this add the following FieldPositionChanged event intot he XamDataGrid
<igDP:XamDataGrid GroupByAreaLocation="None"
    DataSource="{Binding}"
    Name="Grid"
    FieldPositionChanged="Grid_OnFieldPositionChanged"> <!-- our new addition -->
In the source code we’d now need to add the following
private void Grid_OnFieldPositionChanged(object sender, FieldPositionChangedEventArgs e)
{
   if (Grid.FieldLayouts[0].Fields.Contains(e.Field))
   {
      foreach (var field in Grid.FieldLayouts[0].Fields)
      {
         if (field.Index < Grid.FieldLayouts[1].Fields.Count)
         {
            var field2 = Grid.FieldLayouts[1].Fields[field.Index];
            field2.ActualPosition = new FieldPosition(field.ActualPosition.Column,
                        field.ActualPosition.Row,
                        field.ActualPosition.ColumnSpan,
                        field.ActualPosition.RowSpan);
         }
      }
   }

   if (Grid.FieldLayouts[1].Fields.Contains(e.Field))
   {
      foreach (var field in Grid.FieldLayouts[1].Fields)
      {
         var field2 = Grid.FieldLayouts[0].Fields[field.Index];
         field2.ActualPosition = new FieldPosition(field.ActualPosition.Column,
                     field.ActualPosition.Row,
                     field.ActualPosition.ColumnSpan,
                     field.ActualPosition.RowSpan);
      }
   }
}
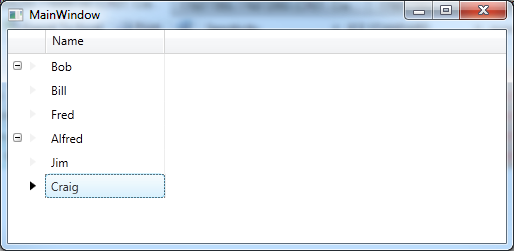
Notice again we need to have knowledge about the number of field layouts to handle this correctly, but this will now work. Reordering the columns occurs across all rows.
This is not perfect – and obviously we need to look at rewriting our code to handle any number of FieldLayouts, but it’s a start. I’ve more things I need to do with this hierarchical data, so if it’s interesting enough I’ll continue with further posts, but for now, between this and the previous post on the subject, we can now display hierarchical data and keep the columns in sync.
Addendum
After writing this post I found a mad desire to rewrite the code to handle multiple FieldLayouts, this has not been tested fully (so use at your own risk) but here goes
private void EventSetter_OnHandler(object sender, SizeChangedEventArgs e)
{
   var lp = sender as LabelPresenter;
   if (lp != null)
   {
      var found = Grid.FieldLayouts.FirstOrDefault(fl => fl.Fields.Contains(lp.Field));
      if (found != null)
      {
         foreach (var fl in Grid.FieldLayouts)
         {
            if (!fl.Equals(found))
            {
               var f = fl.Fields[lp.Field.Index];
               f.Width = new FieldLength(lp.Field.CellWidthResolved);
            }
         }
     }
   }
}

private void Grid_OnFieldPositionChanged(object sender, FieldPositionChangedEventArgs e)
{
   var found = Grid.FieldLayouts.FirstOrDefault(fl => fl.Fields.Contains(e.Field));
   if (found != null)
   {
      foreach (var field in found.Fields)
      {
         foreach (var fl in Grid.FieldLayouts)
         {
            if (!fl.Equals(found))
            {
               if (field.Index < fl.Fields.Count)
               {
                  var f = fl.Fields[field.Index];
                  f.ActualPosition = new FieldPosition(
                       field.ActualPosition.Column,
                       field.ActualPosition.Row,
                       field.ActualPosition.ColumnSpan,
                       field.ActualPosition.RowSpan);
               }
            }
         }
      }
   }
}
Update
Revisiting this code to use it on a project I’m working on, I found I’d missed a piece off. When resizing the columns from the parent/header this works fine but XamDataGrid allows you to resize the child rows and we don’t have code to resize the parents and keep in sync.
An easy way to “fix” this is to disable resizing on columns except for on the header which we can achieve easily by adding to our grid XAML
PreviewMouseMove="Grid_OnPreviewMouseMove"
and in our code behind we have
// you'll need this using Infragistics.Windows;
private void Grid_OnPreviewMouseMove(object sender, MouseEventArgs e)
{
   var lp = Utilities.GetAncestorFromType(e.OriginalSource as DependencyObject,
                typeof(LabelPresenter), true) as LabelPresenter;

   if (lp == null)
   {
      var cvp = Utilities.GetAncestorFromType(e.OriginalSource as DependencyObject,
                    typeof(CellValuePresenter), true) as CellValuePresenter;
      if (cvp != null)
      {
         cvp.Field.Settings.AllowResize = false;
      }
   }
   else
   {
      lp.Field.Settings.AllowResize = true;
   }
}