Monthly Archives: April 2013

Starting out with SpecFlow

SpecFlow is a BDD (Behaviour Driven Development) tool that supplies templates and integration for Visual Studio.

If you are new to BDD (or TDD or unit testing in general) go off to your favourite search engine and search. I’m sure there are far better definitions out there than I’ll probably come up with or try here. For those of you not wishing to waste a moment let’s start looking at SpecFlow.

The idea behind a feature is to define a test scenario in a more human readable way, in fact the perfect situation would be for the domain expert to write the scenarios to act as acceptance tests. SpecFlow is based upon Cucumber and uses the DSL Gherkin to allow the domain experts to write the scenarios.

Enough waffle let’s write a feature. We’ve got a Trade object which has a TradeDate and a StartDate. The StartDate should be calculated to be the TradeDate + 3 days.

Feature: Check the trade date is defaulted correctly
Scenario: Default the trade date
	Given Today's date is 23/10/2012
	When I create a trade
	Then the resultant start date should be 26/10/2012

The Feature text is just a name for the feature and can be followed by free form text to add documentation, in the above case I’ve not bothered. Instead I’ve gone straight to creating a Scenario.

A Scenario is basically the definition of what we want to test. Using the keywords Given, When, Then, And and But (note: I’ve not checked this is the full list). We can create the scenario for the test (don’t get too excited we still need to write the test) and then the Visual Studio integration will by default run the SpecFlowSingleFileGenerator custom tool against this feature file and create a feature.cs which contains the code for calling into your tests.

So we now have a feature file, potentially supplied by our domain expert. From this we get a .cs file generated which calls our code in the correct order and potentially passing arguments from the scenario to our test code. In the above case we want the dates to be passed to our tests. So now to write the code which will be run from the scenario generated code and here we add NUnit (or your preferred unit testing lib.) to check things are as expected.

[Binding]
public class Default_the_trade_date
{
   private Trade trade;
   private DateTime todaysDate;

   [Given("Today's date is (.*)")]
   public void Given_Todays_Date_Is(DateTime today)
   {
      todaysDate = today;
   }

   [When("I create a trade")]
   public void When_I_Create_A_CreateTrade()
   {
      trade = new Trade {TradeDate = todaysDate};
   }

   [Then("the resultant start date should be (.*)")]
   public void Then_Start_Date_Should_Be(DateTime dateTime)
   {
      Assert.AreEqual(trade.StartDate, dateTime);
   }
}

Note: I’ve named this class Default_the_trade_date this is the name I gave the scenario, this is not a requirement but makes it obvious what this code is for.

In the above you’ll notice the use of attributes which match the text in the scenario for each step, i.e. Given, When, Then. The text uses regular expressions, so matches the text to the scenario text but in this case the (.*) converts the dates into arguments to be passed into the test methods.

You can now right mouse click on your project or better still your .feature and select Run SpecFlow Scenarios. Unfortunately the above code will fail. As I’m using British date formats, i.e. dd/MM/yyyy and the default DateTime parser is en-US. So we need to edit the App.config for our scenarios to have

<language feature="en-GB" tool="{not-specified}" />

within the specFlow element.

If all went to plan, when you run the specflow scenarios the tests show green.

Note: If we have multiple features and/or scenarios which maybe use the same text, for example in the above code maybe we have several features and scenarios which use the Given “Today’s date is “. We can set the Scope attribute on the test classes and either mark the scenario with a tag

@tradeDate
Scenario: Default the trade date
   ...

or we can use the Feature and/or Scenario name such as

[Binding]
[Scope(Feature = "Check the trade date is defaulted correctly")]
public class Default_the_trade_date
{
   // code
}

See Scoped bindings for more on this and note the preference is towards not using such couplings.
Service Reference Failure – Cannot import wsdl:portType

Got an interesting exception whilst adding a service reference to a project, as seen below


Custom tool warning: Cannot import wsdl:portType
Detail: An exception was thrown while running a WSDL import extension: System.ServiceModel.Description.DataContractSerializerMessageContractImporter
Error: Could not load file or assembly ‘NLog, Version=2.0.0.0, Culture=neutral, PublicKeyToken=5120e14c03d0593c’ or one of its dependencies. The system cannot find the file specified.

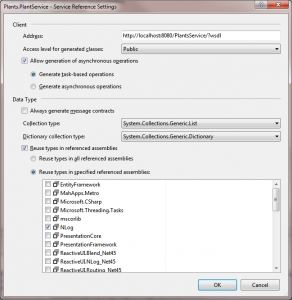
Luckily there’s an easy fix – right mouse click on the reference under the Service References section of the solution and select Configure Service References

ConfigureServiceReference

And as shown, select Reuse types in specified referenced assemblies and check the NLog assembly.

I need to update this post with the whys and wherefores of this change, but it works.

WCF – Basics

I’ve used WCF (and the previous incarnation of web services in .NET) on and off for a while. However once the inital work to set the application up is completed I tend to forget much of what I’ve done to concentrate on the actual application. This is one of the great things with WCF – it just works once set-up.

So this post is going to be written as a quick refresher.

ABC

One of the key things to remember with WCF is the the setting up is pretty much all about the ABC’s

  • A is of Address. In other words what’s the location (or endpoint) of the service.
  • B is of Binding. How do we connect to the endpoint, i.e. what’s the protocol etc.
  • C is of Contract. The application/programming interface to the web service, i.e. what does it do ?

Contracts

Simply put, creating an interface and decorating the interface with [ServiceContract] will mark out an interface as a service contract. Marking the methods that you want to publish with [OperationContract] i.e.

[ServiceContract]
public interface IPlantService
{
   [OperationContract]
   List<Plant> GetPlants();
   // and so on
}

where we’re passing our own complex types back (in the above we have the Plant class) here we mark the class with [DataContract] attribute and each property we wish to publish are marked with [DataMember] as per

[DataContract]
public class Plant
{
   [DataMember]
   public int Id { get; set; }
   [DataMember]
   public string CommonName { get; set; }
   // ... and so on
}

Don’t forget to include the System.ServiceModel assembly and System.Runtime.Serialization.

Hosting a service outside of IIS

Whilst IIS offers a scaleable, consistent and secure architecture for hosting WCF web services, one might prefer to host via a console app or Windows service for example. The following is a simple example of the code needed to get WCF self hosted in a console application.

class Program
{
   static void Main(string[] args)
   {
      ServiceHost serviceHost = new ServiceHost(typeof(PlantService));
      serviceHost.Open();
      Console.WriteLine("Service Running");
      Console.ReadLine();
      serviceHost.Close();
   }
}

Configuring the ABC’s

Configuration of the ABC’s can be accomplished through code or more usually through configuration. I’m not going to dig deep into configuration but instead point to something I’ve only recently been made aware of. Having always edited the app.config by hand.

It’s slightly strange in Visual Studio 2010 how you enable this option but go to Tools | WCF Service Configuration Editor then close it. Now if you right mouse click to get the context menu on the App.config file you’ll see the Edit WCF Configuration option. Now you can configure WCF via this UI.

HTTP could not register URL http://+:8080/ Your process does not have access rights to this namespace

If you’re getting an exception along the lines of “HTTP could not register URL http://+:8080/. Your process does not have access rights to this namespace” whilst writing a WCF web service on Vista or Windows 7 then take a visit to PaulWh’s Tech Blog and download his HttpNamespaceManager.

Just add the url along the lines of http://+8080/ (or whatever port you’re using). Then added group or users (for example BUILTIN\Users and NT AUTHORITY\LOCAL SERVICE) and assign GenericExecute access to them.

This works whilst running within Visual Studio as well as running a standalone EXE.

If you prefer a more hardcore approach then run netsh as admin, either typing

netsh http add urlacl url=http://+:8080/MyService/ user=DOMAIN\user

or you can run netsh (again as admin) and then enter the command

http add urlacl url=http://+:8080/MyService/ user=DOMAIN\user

netsh works like a folder structure, to equally you can type http followed by enter to enter the http section and enter everything after the http section of the command line.

To view the currently set up urlacl’s simple type

netsh http show urlacl

Entity Framework – Dynamic Proxies and WCF

A quick post regarding a simple problem you might find using Entity Framework with WCF. I have a simply little application which uses Entity Framework to access SQL Server and currently this all happens in a little client application.

I decided I wanted to move the DB access into a web service so I could look at writing an iPad or the likes front end to access it. All went well until I got the following exception


An error occurred while receiving the HTTP response to http://localhost:9095/MyService. This could be due to the service endpoint binding not using the HTTP protocol. This could also be due to an HTTP request context being aborted by the server (possibly due to the service shutting down). See server logs for more details.

My web service code looked like the following

public List<Plant> GetPlants()
{
   using (PlantsContext context = new PlantsContext())
   {
       return context.Plants.ToList();
   }
}

The problem is that the return is returning dynamic proxies, of the Plant type, not strictly real Plant types. What we need to do is change the code to add a line to turn off proxy creation

using (PlantsContext context = new PlantsContext())
{
   context.Configuration.ProxyCreationEnabled = false;
   return context.Plants.ToList();
}

And all works.

Quick Start – MahApps Metro

I discovered the excellent MahApps Metro libraries a while back but it wasn’t until I started using github:Windows that I was inspired to really start using this excellent library.

Basically MahApps Metro offers a bunch of styles and controls which duplicate aspects of Windows 8 UI but ofcouse they can be used on non-Windows 8 versions of Windows. For example, I have code on both WinXP and Windows 7 using these libraries and they look great.

This post is just a quick “how to quickly get up and running” with MahApps.

  • Let’s start by creating a WPF Application in Visual Studio.
  • Now using NuGet type MahApps.Metro into the search box of NuGet and install MahApps.Metro
  • In the MainWindow.xaml.cs change the base class from Window to MetroWindow and add using MahApps.Metro.Controls;
  • In the MainWindow.xaml change Window to MetroWindow add the namespace if need be (for example xmlns:Controls=”clr-namespace:MahApps.Metro.Controls;assembly=MahApps.Metro”)
  • Finally add A Window.Resources section to the MainWindow.xaml file as per the code below to enable the Metro styles
<Window.Resources>
   <ResourceDictionary>
      <ResourceDictionary.MergedDictionaries>
         <ResourceDictionary Source="pack://application:,,,/MahApps.Metro;component/Styles/Colours.xaml" />
         <ResourceDictionary Source="pack://application:,,,/MahApps.Metro;component/Styles/Fonts.xaml" />
         <ResourceDictionary Source="pack://application:,,,/MahApps.Metro;component/Styles/Controls.xaml" />
         <ResourceDictionary Source="pack://application:,,,/MahApps.Metro;component/Styles/Accents/Blue.xaml" />
         <ResourceDictionary Source="pack://application:,,,/MahApps.Metro;component/Styles/Accents/BaseLight.xaml" />
      </ResourceDictionary.MergedDictionaries>
   </ResourceDictionary>
</Window.Resources>

Note: After installing MahApps.Metro using NuGet the page http://mahapps.com/MahApps.Metro/ is displayed, it contains the steps above plus more so obviously read that for a fuller explanation. I’ve written these steps out just to show the bare minimum I need to do to get started.

The Singleton Pattern in C#

The singleton pattern has fallen out of favour in recent times, the preference being towards using IoC in it’s place, but it’s still useful. I’m not going to go in depth into coding samples for this pattern as there’s an excellent article “Implementing the Singleton Pattern in C#” which covers the subject well.

A simple thread safe implementation taken from the aforementioned article is

public sealed class Singleton
{
   private static readonly Singleton instance = new Singleton();

   static Singleton()
   {
   }

   private Singleton()
   {
   }

   public static Singleton Instance
   {
      get { return instance; }
   }
}

Note: The private constructor is included as the intention is for the user to use the Instance property to interact with the Singleton instance and not allow creating a new Singleton directly.

System.Lazy has been around since .NET 4.0 and it offers a threadsafe means to implement lazy loading/initialization. So now we can rewrite the above Singleton class with lazy loading

public sealed class Singleton
{
   private static readonly Lazy<Singleton> instance = new Lazy<Singleton>(() => new Singleton());   

   private Singleton()
   {
   }

   public static Singleton Instance
   {
      get { return instance.Value; }
   }   
}

Dispose pattern

A quick post to show the implementation of the Dispose pattern for IDisposable implementations.

Note: this is not threadsafe

public class MyObject : IDisposable
{
   protected bool disposed;

   // only required if we need to release unmanaged resources
   ~MyObject()
   {
      Dispose(false);
   }

   public void Dispose()
   {
      Dispose(true);
      GC.SuppressFinalize(this);
   }

   protected virtual void Dispose(bool disposing)
   {
      if(!disposed)
      {
         if(disposing)
         {
            // dispose of any managed resources here
         }
         // clean up any unmanaged resources here
      }
      disposed = true;
   }
}

Entity Framework – SQL Server CE

This post is based upon trying to get a simple SQL Server CE database up and running with Entity Framework. Something that should have been simple based upon my experience with SQL Server, but there’s a few gotcha’s I came across so I thought I’d post them.

First off, for this I’m using Visual Studio 2010 for this application (I will be using NuGet as well).

  • So to start off create a Console Application
  • Right mouse click on the project and select Manage NuGet Packages
  • In the search textbox type EntityFramework
  • Installed EntityFramework (accept licenses etc). Note: I did have a strange problem where it complained about the project or the likes being used by another process, clicking Install again worked fine.

At this point I decided to create my model in a Code First fashion, refer to my post for more info. on that.

So I’ve been working on and off (less on than off) on a simple little RSS reader, just using it to try out ideas etc. So in this post I’m going to start creating a little SQL Server CE database for it. The database design will not be comprehensive and you may prefer to implement it differently, feel free to do so.

I start off by creating the following classes

public class Feed
{
   public Guid Id { get; set; }
   public string Title { get; set; }
   public string Address { get; set; }
   public string Author { get; set; }
   public string Homepage { get; set; }
   public DateTime? LastUpdated { get; set; }
   public string Comment { get; set; }

   public virtual IList<Post> Posts { get; set; }
}

public class Post
{
   public Guid Id { get; set; }
   public string Content { get; set; }

   public virtual Feed Feed { get; set; }
}

public class FeedContext : DbContext
{
   public FeedContext(string connectionString) :
	base(connectionString)
   {  
   }

   public DbSet<Feed> Feeds { get; set; }
   public DbSet<Post> Posts { get; set; }
}

Note: You may have noticed I’m using GUID’s for what will be our primary keys. I actually started with integers but found out that I would need to generate the id values myself and whilst it’s do-able I decided to switch to a key I could create more easily. In the case of the Feed table we might actually be happy with the Address being the key, I’ll leave it to the reader to decide how they’d prefer to proceed with this, either use GUID’s or create your own integer key generator or switch, in the case of the Feed to using the Address.

Next I create the code in Program.Main to simply create the database for me based upon my model

using (FeedContext context = new FeedContext("Data Source=c:\\Dev\\Feed\\Feed.sdf"))
{
   context.Database.Create();				
}

Obviously change the Data Source to point to a valid folder

I’m going to delete the App.config to remove all the code that was created during the installation of EntityFramework for this example, so feel free to do the same (you can always put it back later).

Deleting the App.config means we’re missing information on the DefaultConnectionFactory to be used, so add the following line above the using(FeedContext…) line that we added previously.

Database.DefaultConnectionFactory = new SqlCeConnectionFactory("System.Data.SqlServerCe.3.5");

If we run the code now we’ll hit another issue – “CreateDatabase is not supported by the provider.”. It appears we cannot generate a database from our model using SQL Server CE’s 3.5 provider.

So we are going to have to code the DB ourselves, either via the Server Explorer in Visual Studio or via SQL Server Management Studio (or any other alternative out there). I’m going to use SQL Server Management Studio as I find the Server Explorer route limiting.

In SQL Server Management Studio

  • Click on the Connect button
  • Choose SQL Server Compact
  • Click the drop down on the Database file combo box
  • Select New Database
  • Enter the location and name of your file, i.e. c:\Dev\Feed\Feed.sdf
  • Press OK then Yes where asked whether you want to continue with a blank password
  • Now press the connect button

If not selected, select your new DB and press the new query button, then paste and run the following

CREATE TABLE Feeds(
	Id uniqueidentifier NOT NULL,
	Title nvarchar(100) NOT NULL,
	Address nvarchar(100) NULL,
	Author nvarchar(100) NULL,
	Homepage nvarchar(100) NULL,
	LastUpdated datetime NULL,
	Comment nvarchar(100) NULL,
    PRIMARY KEY (Id)
)
GO
CREATE TABLE Posts(
	Id [uniqueidentifier] NOT NULL,
	Content [nvarchar](100) NULL,
	FeedId [uniqueidentifier] NULL,
    PRIMARY KEY (Id)
)
GO
ALTER TABLE Posts ADD CONSTRAINT FK_Feed_Post FOREIGN KEY (FeedId) REFERENCES Feeds(Id)

At this point we should now have our code model and our DB model in sync.

Note: If you’re wondering why I didn’t just generate the code model from the DB, it’s a fair question. The reason I didn’t is I wanted the minimalism of Code First plus, I did try a Model First approach as well and I couldn’t get it to use the DbContext and POCO’s.

I’m going to finish up by added a couple of bits of data into the DB and then retrieve them. So first change your Program.Main code to

using (FeedContext context = new FeedContext(@"Data Source=c:\Dev\Feed\Feed.sdf"))
{
   Feed a = new Feed
   {
      Id = Guid.NewGuid(),
      Address = "http:/a/rss",
      Title = "rss a",
      Posts = new List<Post>
      {
         new Post
         {
            Id = Guid.NewGuid(),
            Content = "Item 1a"
	 },
         new Post
	 {
	    Id = Guid.NewGuid(),
            Content = "Item 2a"
         }
      }
   };

   Feed b = new Feed
   {
      Id = Guid.NewGuid(),
      Address = "http:/b/rss",
      Title = "rss b",
      Posts = new List<Post>
      {
         new Post
         {
            Id = Guid.NewGuid(),
            Content = "Item 1b"
	 },
         new Post
	 {
	    Id = Guid.NewGuid(),
            Content = "Item 2b"
         }
      }
   };
				
   context.Feeds.Add(a);
   context.Feeds.Add(b);

   context.SaveChanges();
}

Note: There’s an oddity, possibly in the way I’ve created my data or specific to SQL Server CE, I’m not sure which yet whereby the above will fail against SQL Server CE but work against SQL Server. If we add the following it works.

public class Post
{
   // other properties
   public Guid FeedId { get; set; }
}

Now if you retrieve the data like the following

foreach(Feed f in context.Feeds)
{
   Console.WriteLine(f.Address);
   foreach(Post p in f.Posts)
   {
      Console.WriteLine("\t\t" + p.Content);
   }
}

All should be as expected.

First Impressions – AutoMapper

One of the projects I’m working on (at the time of writing this post) is a C# client which uses Java web services. When creating the proxies we end up with DTO objects which have a few issues, some are aesthetic others functional.

On the aesthetic from they do not adhere to the Pascal case naming convention and use arrays instead of C# Lists, on the functional side they ofcourse are lightweight DTO objects so contain no business logic or the other additional functionality which we’d want in our Domain objects.

So we have ended up with a mass of mapping factories and functionality that converts a DTO object to a Domain object and in some cases the reverse also (not all Domain’s need to be converted back to DTO’s). There’s absolutely nothing wrong with these factories and mapping mechanisms whatsoever, but I came across AutoMapper recently (although it looks like its been around for a long while – so I’m somewhat late to the party) and thought I’d try to use it on a set of similar scenarios.

I’ll start with a couple of simple DTO classes, PersonView and CountryView.

public class CountryView
{
   public string name { get; set; }
}

public class PersonView
{
   public string name { get; set; }
   public int age { get; set; }
   public CountryView country { get; set; }
   public PersonView[] children { get; set; }
}

to start with the domain objects are going to be just as simple as the DTO’s but conforming to our preference of Pascal case property names and IList’s instead of arrays. So the domains look like

public class Country
{
   public string Name { get; set; }
}

public class Person
{
   public string Name { get; set; }
   public int Age { get; set; }
   public Country Country { get; set; }
   public IList<Person> Children { get; set; }
}

Okay nothing very complicated or particularly useful in the real world, if we were trying to model a family tree, but it’s good enough for us to start playing with.

So the next question is obviously how we tell AutoMapper to associate the mapping of one type to the other. This is handled via the Mapper.CreateMap method. We need to tell the mapper how to map every object type that makes up the object tree.

Mapper.CreateMap<PersonView, Person>();
Mapper.CreateMap<CountryView, Country>();

Note: If we wanted to convert the Domain objects back to DTO we’d need Mapper.CreatMap entries with the generic parameters switched also.

Finally, we want to actually convert one type of data (in this instance the DTO) to another type of data (in this case the Domain object). To do this we simply use

PersonView dto = GetPerson();
Person domain = Mapper.Map<PersonView, Person>(dto);

I’ll leave the reader to create the GetPerson method and supply some test data. But upon successful completion of the Mapper.Map call the domain object should now have all the data copied from the DTO plus a List instead of an array.

So within AutoMapper it’s obviously matched the properties by a case insensitive comparison of the property names but what, I hear you ask, if the property names on PersonView did not match those in the domain object.

To solve this we simply add some information to the mapping declarations along the following lines (assuming the DTO object name property is now n, age is a etc.)

Mapper.CreateMap<PersonView, Person>().
   ForMember(d => d.Age, o => o.MapFrom(p => p.a)).
   ForMember(d => d.Name, o => o.MapFrom(p => p.n)).
   ForMember(d => d.Name, o => o.MapFrom(p => p.co)).
   ForMember(d => d.Name, o => o.MapFrom(p => p.ch));

Finally for this post (as it’s mean’t to be the first impressions of AutoMapper not a comprehensive user guide :)) is what if the DTO property names all end in a standard postfix, for example nameField, ageField etc. Maybe the naming convention from the guys developing the web service uses the xxxField format and we’d prefer to not use the same. We wouldn’t really want to have to create the ForMember mappings for every field if we could help it. Instead we could use

Mapper.Initialize(c => c.RecognizePostfixes("Field"));

Note: the solution above is global, so would affect all mappings, but essentially now can handle exact case insensitive matches as well as insensitive matches with the postfix “Field”.